

https://simogo.com/work/device-6/
Entry by Jason Boyd
A. BASIC INFORMATION
Creator: Simogo (https://simogo.com/)
- Magnus “Gordon” Gardebäck (Production & Programming)
- Simon Flesser (Art, Sound & Direction; Co-Writer)
- Jonas Tarestad (Co-Writer)
- Daniel Olsen (Music)
- Jonathan Eng (writer and performer of song, “Anna”)
Creation technology: Unity
Publisher: Simogo
Date (of original release): 2013 (October 17)
Platform(s): iOS
Peripherals required/recommended: head/earphones (recommended)
Rating: 12+ (Apple Store)
Awards/Distinctions:
- 2014 Independent Games Festival: Excellence in Audio
- 2014 Apple Design Award
- 2014 Pocket Gamer Awards: Most Innovative Game Award
- 2014 Global Mobile Awards: Best Entertainment App
- 2014 Nordic Game Awards: Best Nordic Innovation Award
Version used for entry: iOS (Air Pad 2)
B. GAME INFORMATION
Game/eLit Genre(s): Puzzle, Exploration, Digital Narrative (Simogo says DEVICE 6 belongs to the genre of ‘Textual Thriller’).
Time to complete: Approximately 3 hours, depending on one’s puzzle-solving skills.
Replay required/useful?: As a linear story, a player will encounter all elements of the work in a single playthrough.
Gameplay: Using the iPhone/iPad’s touch screen, the player scrolls through what could be described as an ebook illustrated with images and music/sound. There are no pages to flip: rather, in each chapter, the player swipes or drags to see and read portions of what can be thought of as a giant page, laid out as a stylized map or floor plan of the space Anna (the player character) is moving through. The type is set in such a way that the player is often required to switch between portrait and landscape orientations. Throughout the text, there are numerous puzzles that have to be solved to progress, which usually involve tapping the screen. The puzzles represent the main challenge of DEVICE 6; these are fairly straightforward logic puzzles (see D. Walkthrough).
C. LITERARY INFORMATION
Related Literary Genre(s): Psychological Suspense/Thriller, Dystopian Fiction, Metafiction
Story/Plot Summary:
Player249 (the player) uses DEVICE 4 (their iPad) to control Anna, a woman who has been kidnapped and brought to a mysterious island. Player249 helps Anna explore the island with the goal of trying to learn about HAT, the organization that has brought her to the island, why they have kidnapped her, and how she can escape the island.
Unlike most video games, where the player as the player is not a part of or within the gameworld or storyworld (instead usually interacting with it via an avatar or Player Character who does exist in that world), in DEVICE 6 the player is a character (Player249) other than the player character (Anna/Player248). The opening screen displays the following message to the reader: “Before playing, please read the software license agreement and the DEVICE 4 manual for important information about electromagnetic waves.” This indicates that the iPad the player is using is DEVICE 4 (confirmed by the DEVICE 4 schematic found in Chapter 4), and that there are five other numbered DEVICEs, including the titular DEVICE 6, which the player might expect to encounter in their experience of the Anna ‘simulation.’ The meta-narrative continues with the next screen, which asks the reader to undergo a “facial scan” via the iPad/DEVICE 4 screen, after which the player is identified and welcomed as “Player249” (note: this facial and other scans are not real). Given this, the iPad and the reader’s use of it is not extratextual (simply the material means of delivery with no narrative role), but a part of the story. The meta-narrative is returned to after each chapter, where Player249 must complete a questionnaire that concerns the simulation in some way before moving on to the next chapter.
The DEVICE Schematics
The DEVICEs serve the narrative function of offering a technological explanation for the disjunction and connection between Player249 and Anna (aka Player248). While it is a commonplace in video games for the player to control a player character (PC) who is not a simulacrum of themselves and who is controlled externally like a puppet, this commonplace is usually not incorporated into the narrative of video games (an equivalence would be a novel incorporating the presence and activity of the reader of the novel into the novel, like Italo Calvino’s If On a Winter’s Night a Traveller… does). The DEVICEs, therefore, incorporate the player (as Player249) into the narrative by offering a technological explanation for the latitude and limitations of Players249’s access to the experiences and control of the behavior of Anna.
Schematics for the DEVICEs are found in each chapter (separate from the Anna narrative, although it is not clear how or why Player249 has access to them; most likely this is the result of a flaw in the Devices/Software). DEVICE 1 is the “Text Output Chip (Main Simulation Device).”
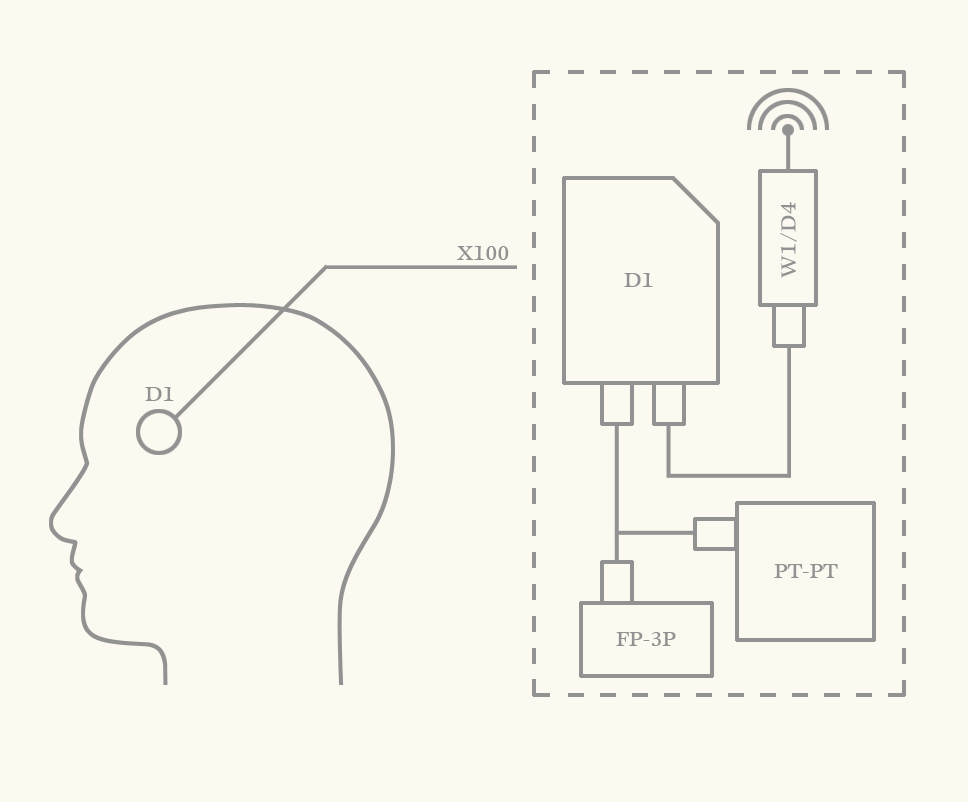
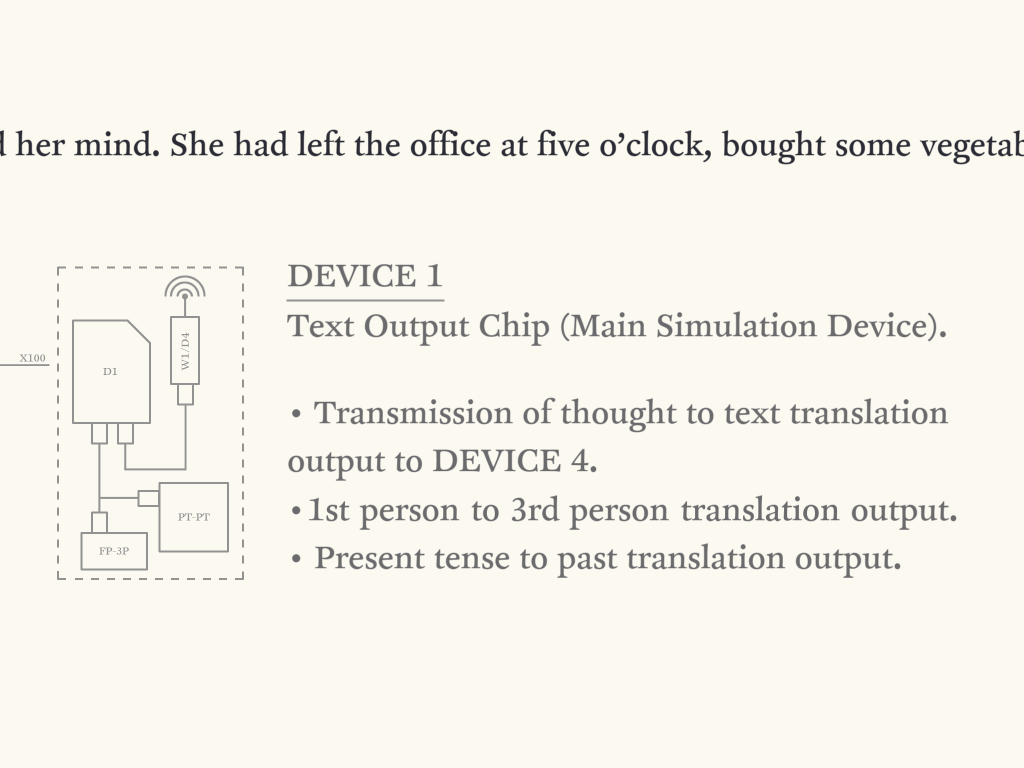
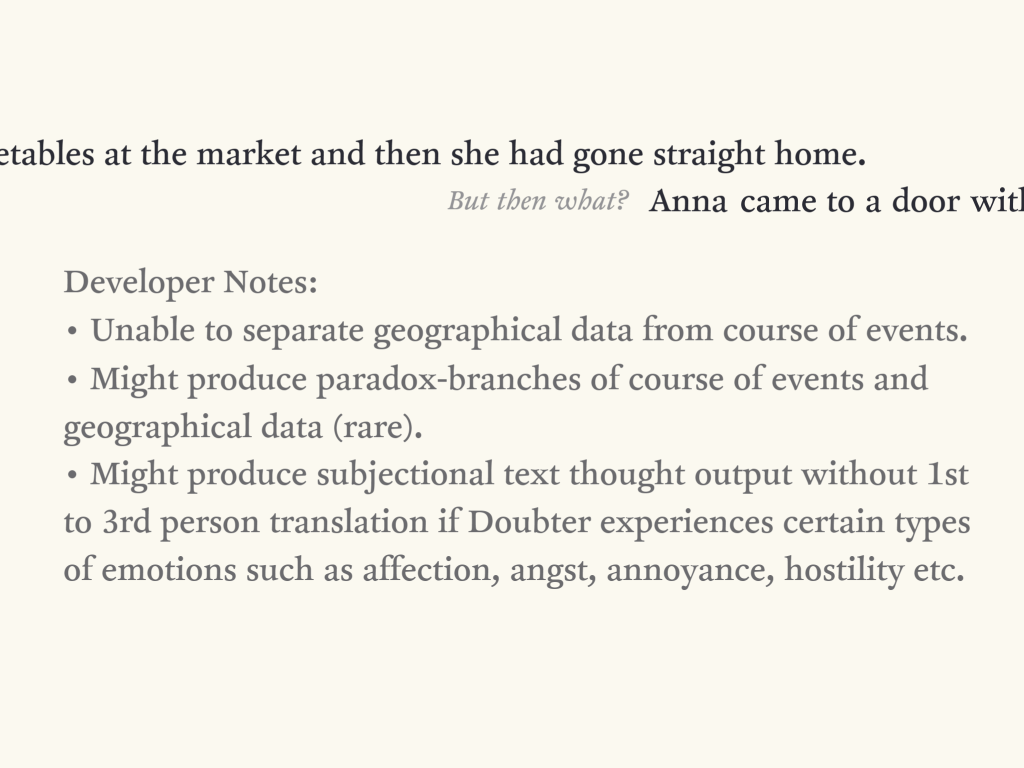
According to the notes, DEVICE 1 does three things: it translates Anna’s real-time sensory experiences into text, simultaneously translating Anna’s first person experience into third person narration (so “I [Anna] try hard to remember” becomes “Anna tries hard to remember”) and her present experience into the past tense (so “I try hard to remember” becomes “Anna tried hard to remember), and then outputting this to DEVICE 4 (for Player 249’s consumption). The developer notes state that DEVICE 1 is “[u]nable to separate geographical data from course of events” (in other words, place and time are linked and fixed, explaining why, if the player retraces Anna’s steps to a specific spatial location that has already been visited, Anna’s thoughts and experiences, and thus the narrative, remain unchanged). It also notes that the first to the third person translation might not work if “Doubter” experiences certain emotions, thereby outputting “subjectional text” (i.e., “subjective text,” or Anna’s thoughts, which are presented in greyscale italic).
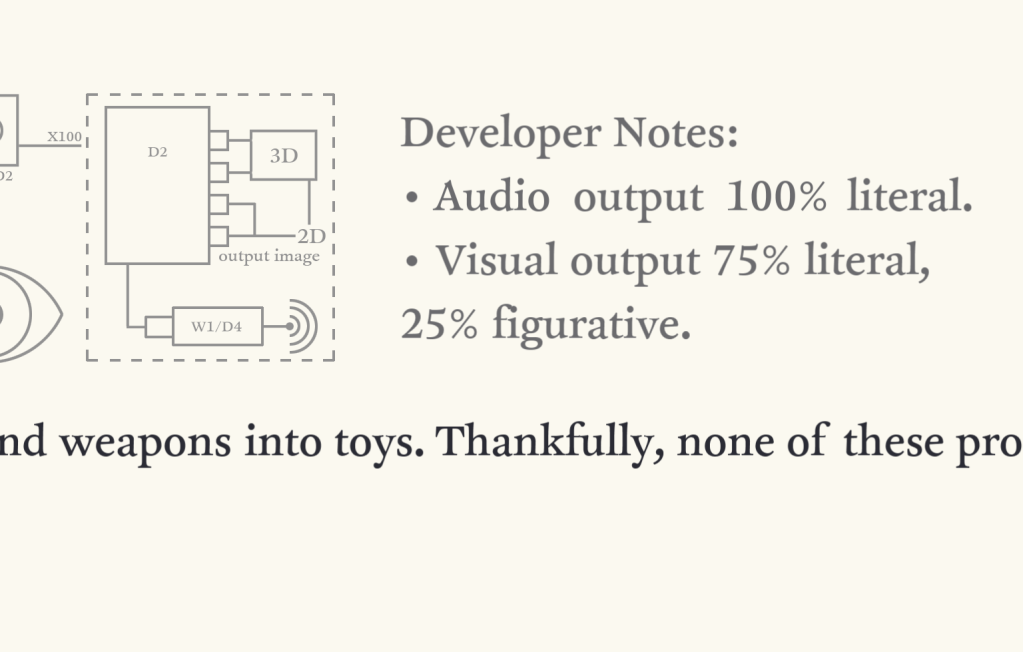
DEVICE 2 is the “Audio Visual Output Chip (Secondary Simulation Device)” (Chapter 2). Whereas the first chip provides the textual output read on DEVICE 4, DEVICE 2 transmits the images and sounds experienced by Anna to DEVICE 4. The schematic implies it is an ocular/aural implant that is in Anna (at the start of Chapter 1, Anna feels as if “[t]housands of nails seemed to pierce her head and her right ear itched terribly”).

DEVICE 3 (Chapter 3) is a “Neuro Control Chip,” a brain implant that “[e]nables neuro-stimulation control” using DEVICE 4, “while output data from DEVICE 1 [text] remains unaffected.” This explains why Player249 is able to control the movement through the narrative and to solve the puzzles (via Anna), but not intervene in the text in any way.

DEVICE 4 (the iPad) is called the “Player Test and Control Hardware + Data Collection Unit.”

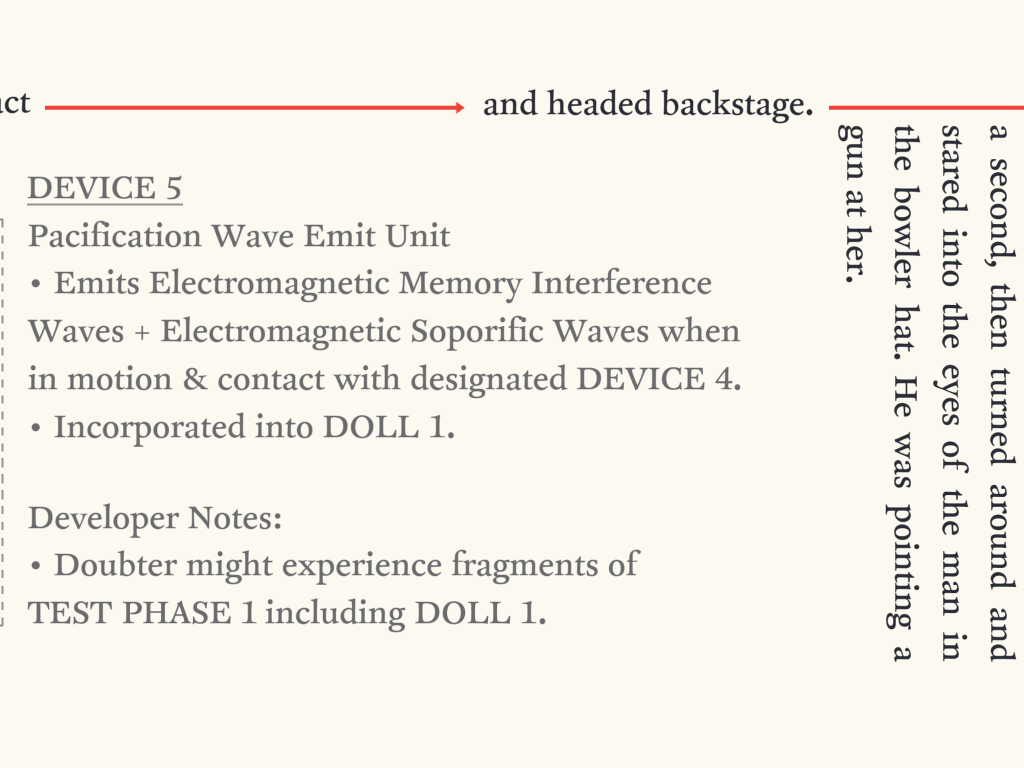
DEVICE 5 is a “Pacification Wave Emit Unit” which “[e]mits Electromagnetic memory interference waves + Electromagnetic Soporific Waves when in motion & contact with designated DEVICE 4” (this explains the radiating circles that end each chapter and render Anna unconscious) and which is “incorporated into DOLL 1,” which is encountered in Chapter 6.

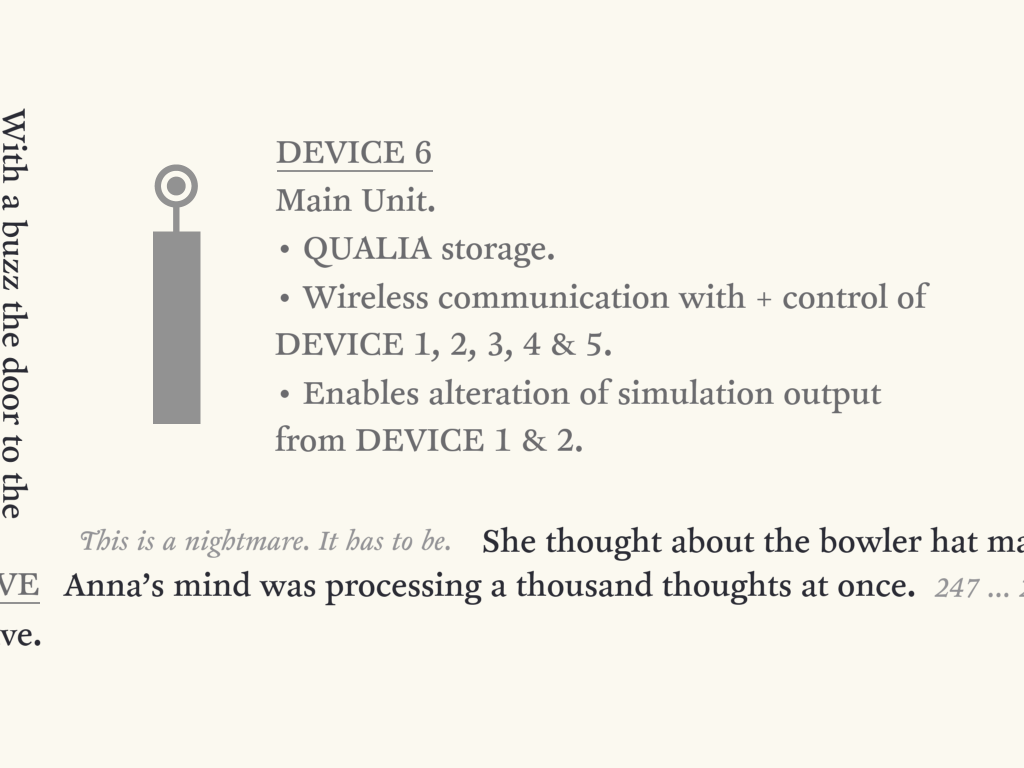
DEVICE 6 controls the other five DEVICES, and also allows for the “alteration of simulation output from DEVICE 1 & 2,” although the developer’s notes indicate a critical issue: altering the output for DEVICE 1 leaves the output for DEVICE 2 unaltered and vice-versa.

Suitability for Teaching: DEVICE 6 is deliberately literary and bookish. Simogo notes that “DEVICE 6 plays with the conventions of games and literature” (quoted in Geist), and J. Nicholas Geist adds: “as soon as you start playing, it becomes clear that we’re meant to feel like this is a game about reading.” DEVICE 6 is an outstanding work for courses that cover book history/book arts. Its visual design, especially its typography and ornamentation, is clearly inspired by print books. However, it takes full advantage of the affordances of the iPad, and each chapter consists of a single ‘page’ (cf. Scott McCloud’s concept of the “infinite canvas”: http://scottmccloud.com/4-inventions/canvas/) that the reader navigates by dragging a finger, and turning the iPad between portrait and landscape modes. Given its careful design, DEVICE 6 can act as a stimulating example of the ‘digital book’.
Because the reader’s/player’s interaction with the work is a part of the narrative, DEVICE 6 calls attention to its status as a text that the reader/player is interacting with; it can therefore serve as an example of metafiction.
D. WALKTHROUGH
Opening Montage
Like the opening sequence of the TV series The Prisoner (which inspired it and other features of the narrative: see Flesser) the montage depicts how Anna ended up on the island. The viewer sees a mail van in transit that stops outside the door of a townhouse. The viewer next sees a rather creepy doll emerging from a box labeled “A Special Gift for Player248.” We see a silhouette drawing of a woman ‘falling’ into radiating circles. Then a wooden crate labeled “Human Cargo” is seen descending between two castle towers. Lastly a line moves through a diagram of an inner ear and enters an image of a brain, with transmission waves emanating from the top of the brain.
(While it would be more accurate to say in what follows, “Player249 has Anna do X,” for the sake of brevity this will be shortened to ‘Anna does X.’)
Note: This walkthough omits details about the story that are not essential for solving the puzzles.
Chapter 1: Awakening
The first room that Anna encounters that has an interactive object is the “3rd Floor, Kirke Room.” In this room there is a “gargantuan cabinet” (image) closed with a “curious lock-like device” (‘L’ and ‘R’ buttons). (The DEVICE 1 schematic is found at this point).
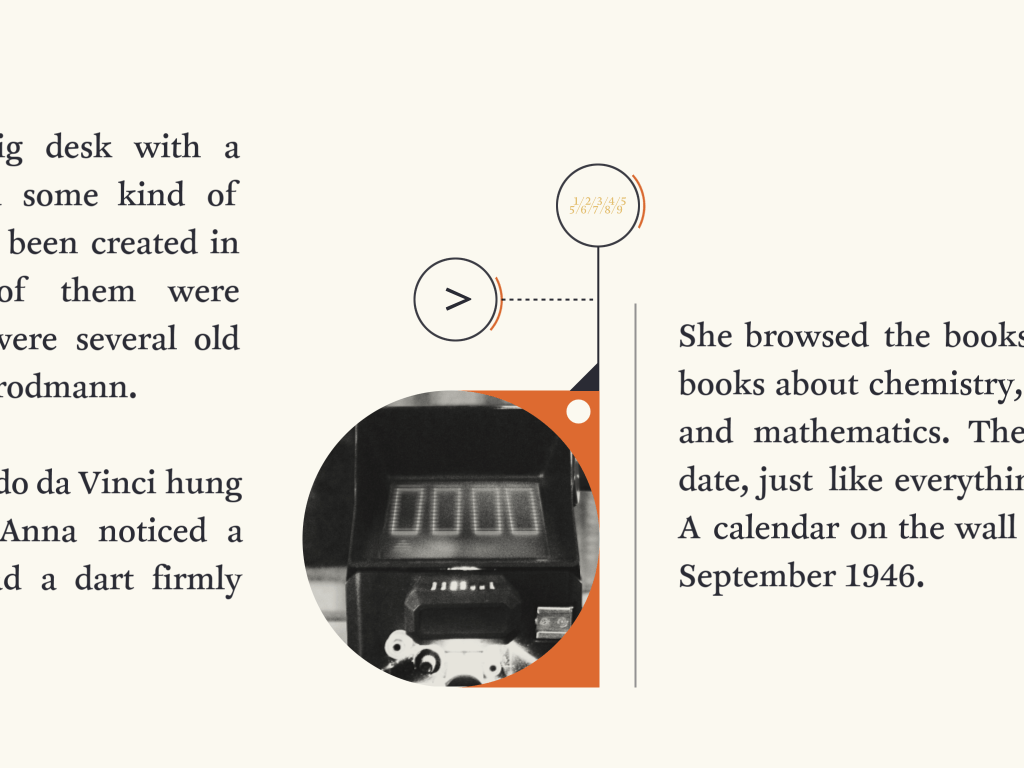
The next room Anna comes to (“3rd Floor, Study”) features a desk with many notes and sketches, some old letters from a Korbinian Brodmann (Brodmann [1868-1918] was “a German neurologist who became famous for his definition of the cerebral cortex into 52 distinct regions” [Wikipedia]), and a computer with a CRT screen (image) where a four-digit number can be entered. There is also a portrait of Leonardo da Vinci on the wall.
The “3rd Floor, Master’s Voice Room” contains a desk with a tape recorder (re)playing the following message: “Good morning. In the room of the Renaissance man, a simple math problem is the key: a framed number, in the room where red meets yellow in a frame; plus, another framed number, between hope and lies; plus, the channel I am on.”
Continuing along the corridor, Anna comes to “a huge steel door” with a screen in front of it displaying output from security cameras. There are four numbered channels that can be clicked through, showing the interiors of two rooms, an exterior shot of the castle, and a tape recorder (from the “Master’s Voice Room”).
In the “Ground Floor, Lobby,” the entrance door is locked, but there is a computer here (image) that looks similar to the one in the Study. At this point, pressing the button only displays “Study Authorization Required.” (Anna cannot access this puzzle until the proper code has been entered on the Study computer.)
At this stage, all the components of the puzzle in this chapter have been encountered. First, Anna has to determine that the instructions for acquiring the code for the Study computer are contained in the recording playing in the “Master’s Voice Room.” Anna has to identify “the room of the Renaissance man” as the Study, the clue being the portrait of da Vinci (a Renaissance man in more than one sense). Here, as the recording states, Anna must solve a “simple math problem” (and enter the solution to the problem on the computer). The first number is a “framed number, in the room where red meets yellow in a frame,” a rather strange phrasing. Red and yellow mixed produce orange, and in the “Northwest Guest Room” (the room Anna awakens in), Anna saw a painting of an orange with “2001” in the centre (there is no mention of the painting being framed, however). The second number is “another framed number, between hope and lies.” This can be seen in the “West Corridor” that the Northwest Guest Room exits into: the word ‘five’ is a framed picture on the wall between ‘hope’ and ‘lies’ framed pictures. The third number is “the channel I am on.” This refers to the security cameras by the steel door: the tape recorder channel is 56. Given the use of “plus,” these three numbers are to be added: 2001 + 5 + 56 = 2062. Entering this number on the Study computer leads Anna to the (now accessible) computer in the Lobby.
[image]
Repeatedly pressing the button displays a sequence of “Elle”s and “Are”s (L’s and R’s) as well as turning solid a row of square outlines along the bottom. Pressing the button to change the squares from all outlines to all solids results in the sequence LRRLLLRLRL. This sequence is used on the lock on the cabinet in the Kirke Room.
Chapter 2: The Story of the Three Bears
The Kirke Room cabinet doors unlock, and Anna opens them to find that the cabinet is actually a door to an outside bridge (“Bear Bridge”) that connects the castle tower she was in to an identical castle tower. On this bridge are three stuffed bears (images) that play recordings when a button is pressed: Bear 1 plays a horn fanfare; Bear 2 plays “Papa Bear to Mama Bear. Are you there? I’m so confused about this operation. I don’t know who to trust anymore”; Bear 3 plays “Mama Bear’s password is 069. Remember, 069. Can I trust you?” At this point, the significance of these recordings is unclear.
Anna enters the tower, and finds herself in the “Launch Facility”; in essence, the tower is a shell comprising a single space. Below, Anna sees technical equipment and in the centre, “a cylindrical container housing three rockets” (image).
In the “Product Evaluation Area” there is “an enormous magnifying glass device” (image), which is not usable at the moment. Continuing, Anne comes to a large steel door with a computer lock that is also not usable. Moving left of the door into the “Strategy & Maintenance Area,” she trips over a lever on the floor, which makes three shooting range targets appear by a brick wall.
Backtracking and continuing down (right) to the “Research & Development Area,” Anna passes by a computer screen (image) displaying the following:
D:\LAUNCHSOFT\USER:
000.PAPA BEAR
001.MAMA BEAR
002.BABY BEAR
[c] HAT.1966
(The DEVICE 2 schematic is here, which transmits what Anna sees and hears to DEVICE 4.)
Exploring the computer screen reveals that Anna has to enter the passwords for Papa, Mama, and Baby Bear to proceed. Player249 should have Anna try ‘069’ for Mama Bear’s password (prompted by Bear 3’s recording): it is incorrect. A return to Bear Bridge is required.
Passing by the Magnifying Glass Device again (“Product Evaluation Area”), Anna now sees the shooting range targets that appeared when she tripped over the lever in the “Strategy & Maintenance Area.” The heads of the three targets are numbered and each has a symbol in the centre of the target that can be discerned by changing the glass’s magnification: Target 2 has a smiley face; Target 3 has a heart; Target 1 has a square.
Revisiting the stuffed bears on the bridge, it turns out that each bear has two messages—Anna has to visit them in different sequences to get all six messages (two are not a part of the puzzle).
To solve the puzzle, Anna has to determine the three passwords through logical inferences from the bear recordings. Anna now knows that Mama Bear’s password is not 069 (as Bear 3 states). The bear who states this must be either Papa or Baby Bear. One of Bear 1’s messages confirms that Bear 3’s statement that Mama Bear’s password is 069 is wrong: “You got Mama Bear’s password wrong. The password you told me was your own, you moron!” So Anna knows that the bear who passed along Mama Bear’s incorrect password has 069 as a password. It becomes clear that the bear who tried to use 069 as Mama Bear’s password is Baby Bear, since Bear 1’s other message is “I see that Baby Bear tried to log in to my account, but the idiot must have read my password upside down!” This tells Anna that 069 is Papa Bear’s password (since it was Baby Bear who tried to log into Mama Bear’s account, and the bear who told him wrongly that it was 069, which was his own password, can only be, by elimination, Papa Bear), and that Mama Bear’s password is 069 upside down, i.e. 690. Since now we know Mama Bear’s and Papa Bear’s passwords, the statement made by Bear 2, “My password was just yours and Papa Bear’s, added together” must be spoken by Baby Bear, whose password is 759 (690 + 069).
Anna returns to the computer and enters the logins for each bear. Logging into each account unlocks one of the three screens on the keypad for the large steel door. The keypad consists of three numbered buttons. Pressing one button moves between the screens; the other runs through a set of common symbols on each screen, amongst which are the symbols on the shooting range targets. Matching the symbols to the corresponding screen (1 square; 2 smiley face; 3 heart) unlocks the door.
Chapter 3: Tiptoe Through the Tulips
Anna is in the “Garden, East Castle.” She passes a group of classical statues (image) with the letters ID, IG and T written (or superimposed) on them. She continues along the “Freedom Path” (the schematic for DEVICE 3 is here), and then along a garden path (image) and past a bed of tulips (image). She then passes the “Life & Death Wall” (image), on which is written:
FUNDS!2501R1T5%Y
MARKETING!UT4E2S
Continuing on, she reaches a pedestal with a plaque. Touching a black rectangle opens up a letter addressed to Anna as a “faithful customer,” and presenting her with a Venetian Mask. When worn, this acts as a sort of infrared viewer, allowing Anna to see things that are hidden from normal sight. Continuing on, she reaches the “Time Compass Gazebo,” where there is the exit puzzle: a clock dial (segmented into 12) (image). Pressing the button moves the hand on the dial. A sign contains the following riddle:
“Across a bridge only to be seen by a faithful customer, a piglet tells only half of the truth. The rest of the truth is obscured by invisible flowers.”
Since Anna is addressed as a faithful customer in the letter accompanying the Venetian Mask, she can surmise that she needs the mask to see the bridge. Putting the mask on and retracing her steps she discovers, just before the “Life & Death Wall,” an “Augmented Bridge” that leads to the “Botanical Research Facility.” Here there is a sign (image) that reads (with the mask off):
“Before the hours, south / After the minutes, east.”
There is a strawberry cake here, which the hungry Anna starts to eat, only to discover within a dead starved piglet, with a strip of paper in its mouth reading:
“First come the hour, then come the minutes.”
This message (as the riddle in the Time Compass Gazebo implies) is one half of the full truth (and not a half-truth or lie). Putting on the mask, and looking at the sign again, Anna now sees flowers (the “invisible flowers” of the riddle) covering the words “south” and “east” (the “rest of the truth”).
Anna now knows from the sign and the dead piglet’s message that the sequence of points on the dial of the Time Compass that have to be entered is south, hour, minutes, east. But she still needs to find the actual hour and minutes. Retracing her steps with the mask on, the bed of tulips image is now overlaid with the message:
Look here are flowers
And statues stand tall
For they are the hours
And minutes by the wall
Passing by the garden path image, Anna sees the message: “Only that which is not seen in disguise matters by the wall”.
With the mask on, extra letters appear superimposed on the statues image, spelling “MIDNIGHT.” Returning to the Life & Death Wall, some portions are redacted when viewed with the mask (“in disguise”). The portions that are redacted (“not seen”) spell out “FORTY MINUTES.”
Anna now has the sequence order and values for the Time Compass: Half-past (south or 30), Midnight (12), 40, and quarter-past (east or 15).
Chapter 4: An Inverted Funeral
Anna awakens in a coffin in the “White Chapel.” A priest with a gramophone funnel for a head (image) stands beside her, intoning: “We are gathered here to say farewell to doubts. To grieve the passing of a player. But also, to welcome a believer. Let us forever forget the doubts she once felt. Let us bury her past failures and past mistakes. She has now gone home. Now, together, let us say the welcoming words: The moon: let her in [laughter]. The head of a black dog: let her in [laughter]. A smile from a stranger: let her in [laughter].”
The priest’s body is made of audio equipment. It is on channel 1. Channel 2 plays a recording, but it is backwards. (The other channels are not relevant for the puzzles.)
In the “Black Chapel,” a mirrored recreation of the “White Chapel” (which includes the DEVICE 6 text and images being presented as mirror-images), there is a framed picture by the altar titled (backwards) “Our little town” (image), which contains a 3×3 grid. In this mirror image, there is a figure of a house with a peaked roof and chimney (top left), and question marks top centre, left middle, and left bottom:
| house with peaked roof & chimney | ? | blank |
| ? | blank | blank |
| ? | blank | blank |
The recording on the priest’s channel 2 can be heard forwards here:
“South of Agent Alpha lives Agent Beta.
Between Agent Alpha’s house & Agent Beta’s house, there’s an old abandoned house without any doors.
Me and Agent Alpha are neighbors.
Agent Alpha’s house is the only house in our town with a chimney.
I live in a modern house with a flat roof, just like Agent Beta.”
In “Glory Road,” Anna finds in her pocket a piece of paper with “the solution IS MY EX” scribbled on the back. On the front of this paper (image) (which reads at the top, “A handwritten hint is included on the back of this note. We will make note of any usage of said hint”), under the heading “Link Test,” there is another 3×3 grid (blank) with letters around the four sides: MNY (left); GHI (top); DEX (right); RST (bottom). The DEVICE 4 schematic is found here.
Anna sees ahead of her a man in a dark suit and bowler hat who disappears into the woods, and decides to try and catch him.
In the “Believer Woods,” Anna comes across a flock of sheep mesmerized by a projector screen, which after the title “Welcoming Words,” displays a series of figures consisting of squares and triangles (or squares halved diagonally).
Anna continues on and sees the man enter a lighthouse. At “Fool Hill, Lighthouse Shell,” there is a panel consisting of a 3×3 grid of screens that enables access to the lighthouse. At the bottom there is a slide button with three settings: a triangle/diagonal half-square; a house icon; and “LT.” Anna can manipulate this slide button as well as select a screen in the grid and select a range of icons to display on the screens.
Puzzle 1 (triangle/diagonal half-square setting)
This draws upon the priest’s “welcome” speech (“White Chapel”) and the projector screen figures (“Believer Woods”). The relevant “welcoming words” are: the moon, the head of a black dog, a smile from a stranger. The projector screen shows (amongst others) figures for “The Black Dog,” “The Moon,” and “The Stranger.” These need to be combined and entered on the screens, i.e, the head only of “The Black Dog” (top left), “The Moon,” and the smile only of “The Stranger” (bottom row). All the screens except for the middle-left will be filled: entering the correct sequence will display ‘OK’ on every screen.
Puzzle 2 (house icon setting)
The house icon code relates to the framed “Our little town” grid and the recording in the “Black Chapel.” To enter the correct combination, Anna has to fill in the question marks on the 3×3 grid with the correct house icons, based on the ‘Agent Alpha and Beta’ recording. First, the grid has to be reversed so that it is no longer a mirror-image, i.e.:
| blank | ? | house with peaked roof & chimney |
| blank | blank | ? |
| blank | blank | ? |
Since the recording notes that Agent Alpha’s house is the only house in town with a chimney, it must be the one already pictured in the grid top-right. Since Agent Beta lives south of Agent Alpha, Agent Beta’s flat-roofed house must be either right-middle or right-bottom. Since there is a doorless abandoned house between the Agents’ houses, it must be right-middle and Agent Beta’s house bottom-middle. Therefore the riddle speaker’s flat-roofed house is top-centre:
| blank | house with flat roof (Speaker’s house) | house with peaked roof & chimney (Agent Alpha’s house) |
| blank | blank | doorless abandoned house |
| blank | blank | house with flat roof (Agent Beta’s house) |
The house icons (there are six to choose from) representing these features (chimney, doorless, flat roof) have to be entered into the relevant screens: entering the correct sequence will display ‘OK’ on every screen.
Puzzle 3 (“LT” setting)
This puzzle is connected with the paper Anna finds in her pocket (“Glory Road”). The symbols on the screens for this setting are a horizontal line, a vertical line and a series of L-shaped lines. Anna must determine that these lines must be placed to connect letters on the grid on the paper, and the “IS MY EX” provides the solution. The tricky one is IS, but once Anna realizes that the panel screens do not allow for overlapping lines (there is no cross or + symbol), it becomes clear. If MY and EX are done first, there is only one path for IS.
Chapter 5: The Show
Still in pursuit of the man in the bowler, Anna enters the lighthouse shell and finds herself in a lift that lowers her to the Club Rasoir, a turn-of-the-century theatre. She uses the Ladies’ Room, and notes that the Men’s Room has a number lock (image). In the theatre itself, she witnesses singer/songwriter Jonathan Eng performing a tribute song to her (although the provided lyrics have “[Player248]” in place of her name).
“Backstage,” there is a spotlight focused on a golden cushion with a bowler hat on it. A voice behind Anna says: “You have impressed us, 248. It is time for you to join us now.” Anna turns to see the man in the bowler pointing a gun at her. He continues: “I was the one who came here before you and I was just as confused, but please let me–,” at which point Anna punches him and knocks him unconscious. Player249 (the player) then observes internal messages from HAT Surveillance reporting that Player248 has “taken down the guide” (i.e., the man in the bowler) to which HAT Simulation responds that he has paused the simulation on Player249’s device until he gets further instructions for HQ. A “Simulation Paused” sign appears on screen, followed by a message from HAT HQ saying that Anna can probably make it to the main unit herself (without the guide), and “by then she should be convinced.” The simulation is resumed.
The man in the bowler is carrying a tablet (image), whose screen reads: “Please enter your HAT ID.” Anna enters 247 (since the man is the Player who “came here before you,” Player247), and is presented with a menu: Notes; Map; Projects; Messages. The Notes and Projects sections contain information about the DEVICEs experiment, which is part of “Project Free Will,” the goal of which is to ensure complete external control of subjects while maintaining the illusion of free will.
The Map consists of a map of the island, with circled letters from A to F designating particular sites. There is also a list of four “Island Surveillance Routes” that use these letters: A-C-F; B-F; E-D-B-F; B-F. There is a note that surveillance routes must be carried out in straight lines.
In Messages, there is an exchange with 247 where he’s forgotten the men’s room password. His respondent tells him to “Take a look at the routes.” By drawing straight lines between the letters on the map for each surveillance route, four numbers are traced out: 7141. This is the code to the Men’s Room.
Chapter 6: Technical Perfection
Anna finds herself in a “Storage Cave.” The DEVICE 6 schematic is here. She continues through the cave to “Revelation Beach.” In the distance there is a pier on whose boardwalk is an old house with a modern globe-like addition. Inside is the “HAT Base of Operations.” She has a memory of this space from what she thinks is a game. Going up a spiral staircase she comes to the “Omniscience Globe.” A plaque on the floor in front of it reads “VI.” On the screen of the Globe/DEVICE 6 appears a message granting permission to operate it. An internal dialogue pits an Anna who idolizes the Globe against an Anna who says it’s just a machine and who wants to turn it off. Anna turns off DEVICE 6, which reboots, and starts up the other (“slave”) devices, including DEVICE 4. A TOS (terms of service) document appears, “HAT’s Guiding Principles, Our Operations & The Unquestionable Ways of DEVICE 6,” which explains HAT’s techno-cult. At the end of this document, the player is presented with a choice of agreeing or disagreeing with the TOS.
Epilogue: Hello, Goodbye
The Epilogue starts with “DEVICE 1 [Text Output Chip] Alteration Sequence.” Anna continues along the boardwalk behind the pier house, having sent out an SOS that was answered. A grizzled old captain and his fishing boat arrive. As they prepare to depart, images of a man wearing a bowler hat walking along the boardwalk towards Anna are seen. As the ship pulls away, the man fires a gun and blood spatters over the screen. The credits follow, and then “The End?”
A message to Player249 informs them they will be given a complimentary gift for their shared information and opinions. They are taken to the HAT Store to redeem their accrued 600 points (accrued by answering the questionnaires between chapters). The only item that can be exchanged for 600 points is a “Precious Doll.” Upon selecting the doll, Player249 is informed it will be delivered the next business day.

E. SOURCES AND RESOURCES
- Wikipedia entry: https://en.wikipedia.org/wiki/Device_6
- Metacritic critic reviews: https://www.metacritic.com/game/ios/device-6/critic-reviews
- YouTube gameplay video: Tamil, https://www.youtube.com/playlist?list=PLiCwdvC57cBpS04vwVv6UrnyyMmHMGmDG
- Simon Flesser. The Complete Guide to References and Inspirations in DEVICE 6. Simogo Blog, April 28, 2014.
- Geist, J. Nicholas. “DEVICE 6 is a mystery game that creates as many mysteries as it solves.” Kill Screen, n.d.
