
Entry by Jason Boyd (revised 10 August 2024)
A. Basic Information
Creator: Lucas Pope (https://dukope.com/)
Creation technology: Unity
Publisher: 3909 LLC (Lucas Pope)
Date (of original release): October 18, 2018 (PC: MacOS/Windows)
Platform(s): PC, Switch, PS4, Xbox
Peripherals required/recommended: Keyboard and mouse; speakers/headphones
Rating: ESRB M (Mature 17+)
Awards & Distinctions:
- 2018 The Game Awards: Best Art Direction
- 2019 Independent Games Festival: Grand Prize & Excellence in Narrative
- 2019 BAFTA Games Awards: Game Design & Artistic Achievement
- 2019 Game Developers Choice Awards: Best Narrative
Version used for entry: MacOS (High Sierra 10.13.6)
B. Game Information
Game/eLit Genre(s): First Person Detective/Mystery; Environmental Narrative Game (Walking Simulator). Lucas Pope describes the game as “an insurance adventure with minimal colour.”
Time to complete: 8-9 hours.
Replay required/useful? If one plays with the goal of discovering the fates of all the persons on the Obra Dinn, one has completely explored the work’s content.
Gameplay
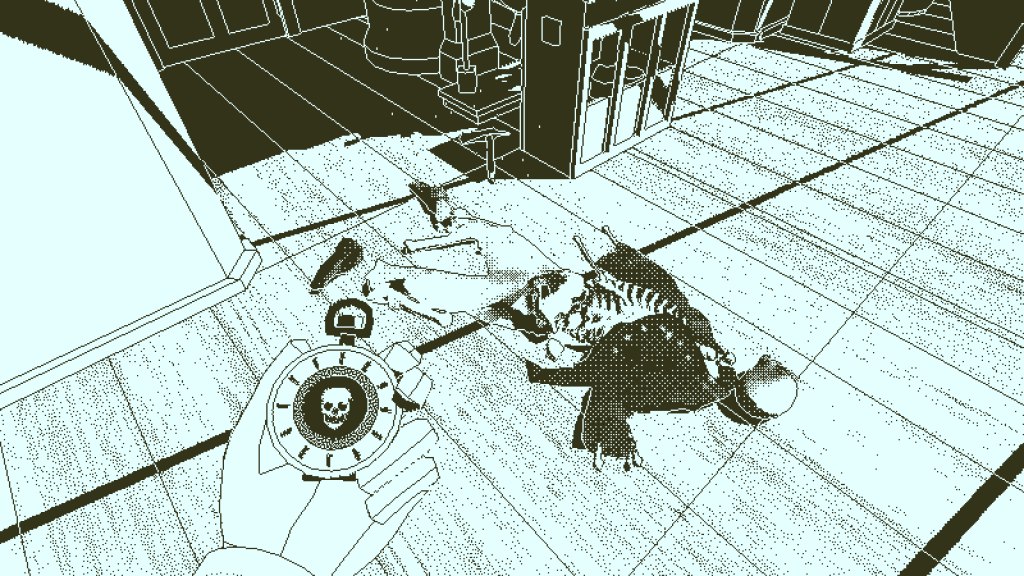
Played from a first-person perspective, the player (a Chief Inspector of Insurance and Claims) explores an East India Company merchant ship, the Obra Dinn (rendered in 3D and using a “1-bit” monochromatic graphical style inspired by games on early Macintosh computers), using WASD keys to move and the mouse to look around, and left-click (or space bar) to activate a magical pocket watch, the Memento Mortem (as well as to climb aboard/disembark from the ship and open doors).
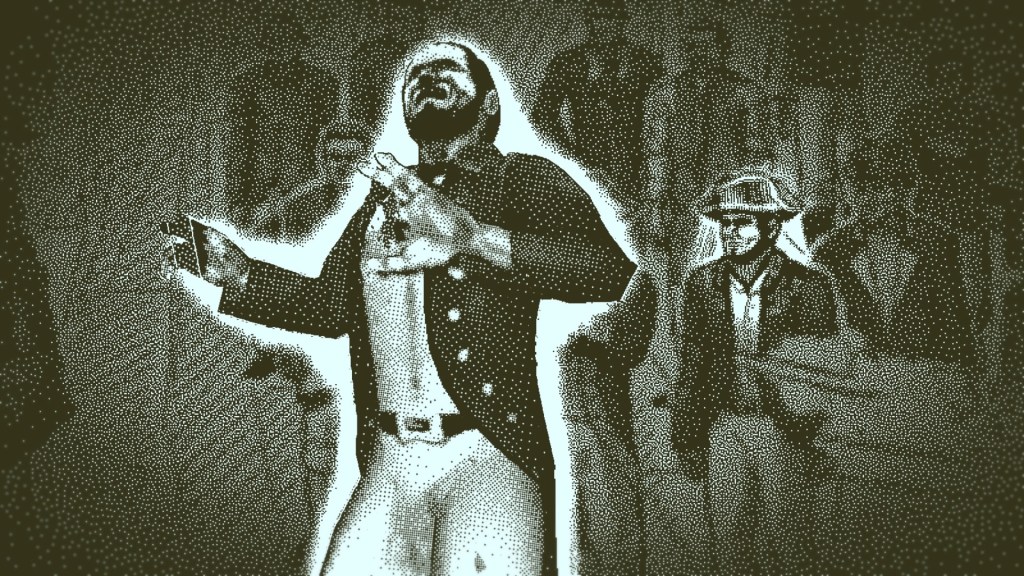
The Tab key is used to access the logbook. It contains: “The Journey” (a map of the Obra Dinn’s intended and, eventually, actual courses); “The Ship” (a plan of the ship’s four decks); “The Crew” (the crew and passenger manifest); “Life at Sea” (a composite drawing made by the ship’s artist with depictions of all the crew and passengers, consisting of three separate scenes: “Under Way” [mostly featuring the lower-rank crew and the passengers], “Formosan Royalty” [the four Formosan passengers], and “Justice at Sea” [an execution by firing squad featuring most of the officers and higher-ranked crew members]); sections for the ten chapters of the story; a Glossary (of ship and crew-related terms); and a progress tracker with a skull at the centre around which lines radiate representing fates that have been solved.

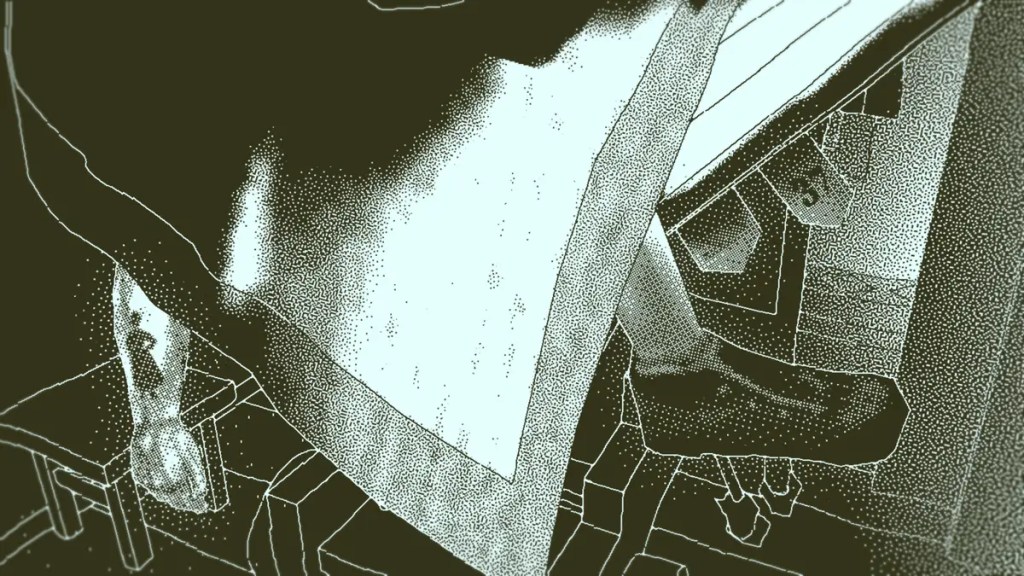
Initially, the Inspector must find skeletal remains that are on the ship in the present (signaled by swarms of flies around the remains; the location of these is indicated in the logbook by Chapter Parts whose titles are circled). When the player uses the Memento Mortem on a set of remains, the screen cuts to a Chapter & Part title with a captioned audio recording of the memory, followed by a still 3D tableau of the memory that the player can move around in and explore from various perspectives.
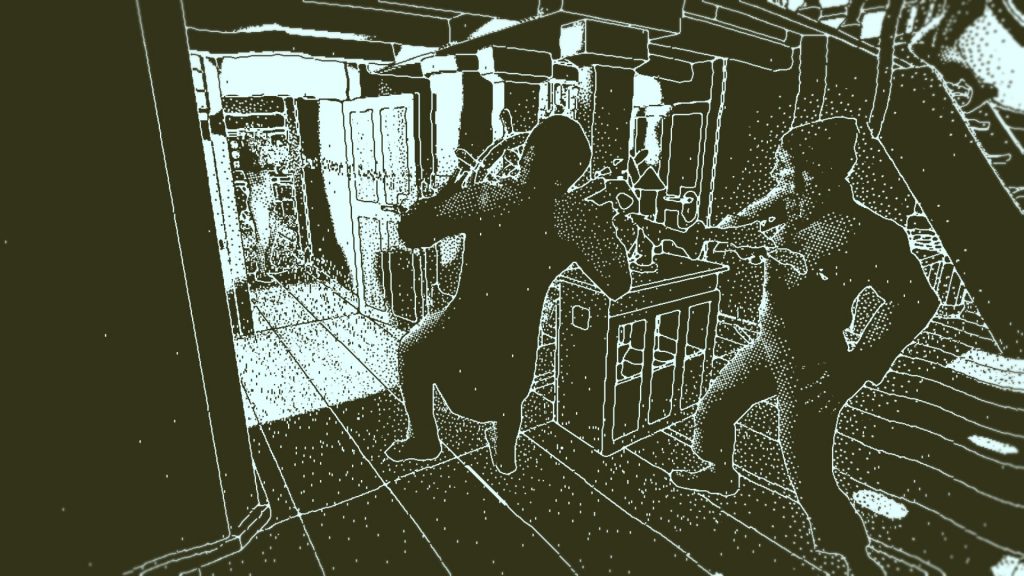
The player can focus on people in the tableau using the E key, which superimposes the person focused on over the logbook’s composite drawing, with that person highlighted in the drawing.
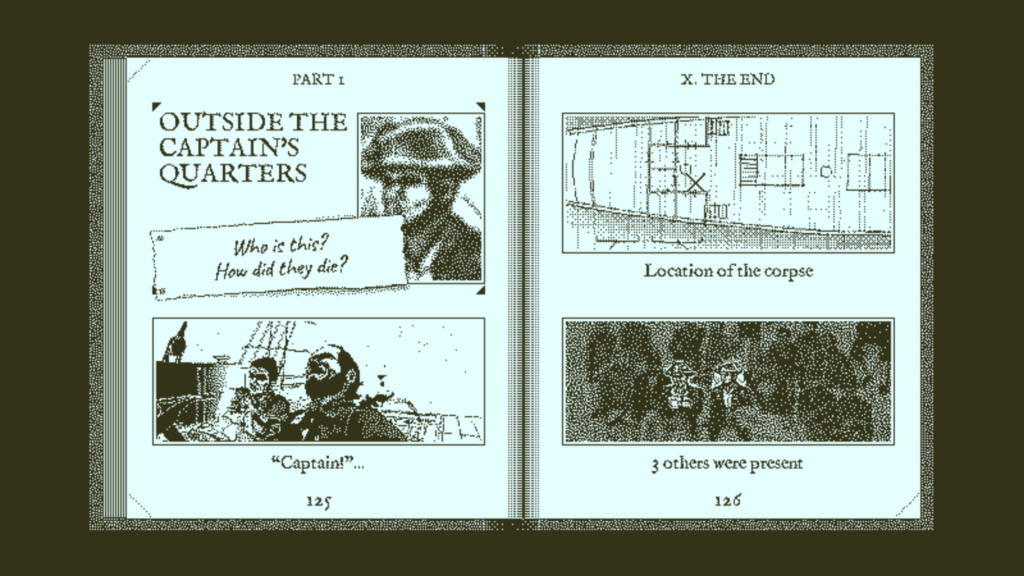
After a fixed time period, the memory closes and the logbook opens to and populates the relevant chapter and part (each chapter title has a map detail that can be clicked on to open the course map and that shows where in the Atlantic the ship was at the time). Each Chapter Part contains:
- A headshot of the person(s) who died in the memory, taken from the composite drawing (blurred until the player has enough information to reasonably make an identification) and a boilerplate description (“ Who is this? How did they die?”)
- A snapshot detail of the tableau that opens a transcription of the dialogue (if any) of the scene (with any words spoken by the deceased marked with an ‘X’)
- An indication on the deck plan of where on the ship they died (or to where their corpse was moved) and
- A representation of the composite drawing with all of the other people present in the tableau highlighted.
Clicking on the boilerplate description accompanying the headshot opens menus where the player can select 1) a name from the manifest; 2) the cause and instrument of death; and, where relevant, 3) the agent responsible for the death. The player must use visual, verbal, and audio cues in conjunction with the crew and passenger list and the composite sketch to supply these pieces of information. The number of memories in which the person appears in can also be accessed here (underneath the headshot): this opens a screen that indicates the First [i.e., earliest chronological] Memory the person appears in and the Memory in which they perished. The player can also see on the deck plan where on the ship the person is in the memories in which they appear, sometimes with lines between points in cases where they appear in multiple parts of the same chapter, showing their path chronologically.
The Fates/Agents menu is quite extensive, and there appear to be fates and agents that never need to be used to successfully complete the game. Therefore, there is a degree of latitude in how some fates can be labelled; that is, multiple options (usually for causes of death) in some cases are considered ‘correct.’
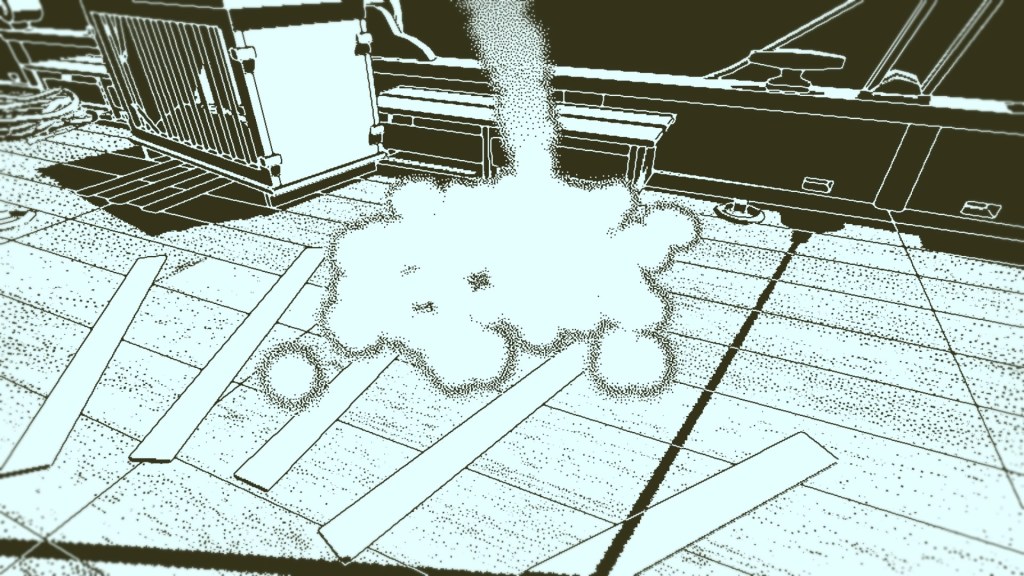
Upon closing the logbook after the initial encounter with a memory, the player returns to the tableau, holding a now shaking Memento Mortem, which then can be activated to discover the locations where others perished in the same Chapter. When the player does this, the scene goes dark and a white burst–a scan, in effect–radiates from the Memento Mortem to reveal a white outline (like a heat signature) of a body somewhere on the ship. When the player approaches the body outline and uses the Memento Mortem on it, the player is returned to where they are on the ship in the present, with the Memento Mortem emanating vapour, which, when the Memento Mortem is again activated, becomes a vapour trail that winds its way to and ‘materializes’ the corpse as a ghostly shadow where it was initially detected by the ‘scan’ (unlike the skeletal remains, these bodies, once discovered, persist as ghostly shadows but are physically not present–presumably they were tossed overboard after death).
After exploration of the other corpse(s) accessible via a given tableau, a doorway opens somewhere in the vicinity of the player that allows them to return to the present. All the memories can be re-explored by using the Memento Mortem on the corpses.
Once all the parts of a chapter have been accessed, the chapter title page (below the map) shows a series of Xs or slashes (/) to indicate, respectively, which identifications and causes of death have been successfully completed and which remain. The end of the chapter will also display any ‘Disappearances’: people who disappeared during the chapter and who did not perish on the ship.
The correctness of the player’s deductions of the identities and causes and agents of death of the crew and passengers are confirmed only in groups of three. Surmises are initially entered in the logbook in a ‘handwritten’ style, which changes to a ‘typeset’ style once confirmed. The number of successful deductions are tracked on a page at the back of the logbook, where each deduced fate appears as a line radiating around a skull.
C. Literary Information
Related Literary Genre(s): Mystery/Detective Fiction, Sea Adventure, Historical Fantasy
Story/Plot Summary
In 1807, a missing ship owned by the East India Company, the Obra Dinn, drifts into the harbour of Falmouth in the county of Cornwall, England. It is apparently deserted. The ship disappeared in 1802 during a voyage from Falmouth to the Orient, never reaching its rendezvous point at the Cape of Good Hope, and was declared lost at sea the following year. A claims adjuster (official title: Chief Inspector, Insurance and Claims) from the London office of the East India Company (the Player Character, whose voice is randomly set as female or male) is rowed to and explores the ship in order to determine what happened and assess the Company’s liabilities. In order to do this, the Inspector has been given a logbook and the “Memento Mortem” (“Remember Death”), a pocket watch which enables her to access the moments in the past (memories) when individuals on the ship perished or disappeared. The logbook and Memento Mortem have been provided by the ship’s Surgeon, Henry Evans, who, in the “Preface” of the logbook, asks the Inspector, when she has finished her investigation, to mail the logbook to the Company’s French Office of Affairs in Morocco. (It is never explained how or why Evans has the Memento Mortem.) A note in the logbook for one empty ‘chapter’ section (VIII) has a note from Evans reading: “This chapter will remain unknown until you leave the ship and return the book to me.” After the Inspector has concluded her on-board investigation (where it is possible to fully solve all but two of the fates of the crew), she leaves the Obra Dinn, and a week later files her assessment report. A year later, she receives a package containing the logbook (which she mailed to Evans as per his request) and an item that enables her to access the remaining chapter and solve the last two fates.
The story that emerges from the adjuster’s investigation is (chronologically) as follows:
The East India Company ship the Obra Dinn is embarking on a voyage from Falmouth to the Cape of Good Hope at the tip of Africa. Besides cargo, there are a number of passengers, including the Captain’s wife and four Formosans: Bun-Lam Lim and It-Beng Sia (described by ship’s artist Edward Spratt as “Formosan Royalty”) and their two guards. The Formosans (Formosa being an earlier name of Taiwan) have with them a large chest, which they are keeping closely guarded in a cabin on the Cargo Deck, stationing one of their guards, Hok-Seng Lau, outside the cabin door.
When the Obra Dinn is west of the Canary Islands, Second Mate Edward Nichols, who has enlisted five members of the crew, executes a plot to steal the Formosan chest and kidnap the Formosan ‘royals.’ He knocks guard Hok-Seng Lau unconscious, and examines the chest, revealing a shining conch shell in the drawer at the bottom. While engaged in doing this, Nichols is interrupted by passenger Nunzio Pasqua, and he stabs Pasqua to death. Nichols, possibly aided by his accomplice Li Hong (a topman) acting as translator, takes advantage of the fact that none of the Formosans speak English to convince the Captain that Hok-Seng Lau has confessed to murdering Pasqua. As a result, Lau is executed by firing squad. The plotters then escape the ship in two lifeboats with the chest and the Formosan ‘royals,’ heading for the Canary Islands.
At sea, the Formosans indicate their fear they may be attacked, and suddenly three mermaids appear–two wearing shining conch shells like the one in the chest–quickly killing the four rowers. It-Beng Sia, who is in the boat with the chest, takes the conch shell from the drawer, opens the chest’s top lid, and plunges the conch into the liquid in the compartment, burning his arm to the bone. Beams fly out from the liquid, striking the mermaids and rendering them unconscious. This action comes too late for Lim, who dies after being clawed and bitten by a mermaid, and Sia himself dies from the injury to his arm. Nichols, who has been cowering in the bottom of one of the boats during all this, drags the unconscious mermaids into the boats and rows back to the Obra Dinn. As he approaches, he is shot by the other Formosan guard, Chioh Tan.
At this point, the Obra Dinn starts to turn around and head back to England. While the chest and mermaids are being brought onto the ship, the Captain, through an interpreter, interrogates Tan about what he knows about the chest and the mermaids. Before Tan can fully respond he is killed by a spike shot from a mermaid (who are together being lowered to the deck in a drag net). The mermaids are placed on stretchers and taken into the ship. As the carriers of the mermaids near the lazarette, they are attacked by the Captain’s steward, Filip Dahl. Dahl tells the Captain the mermaids are evil and says they should be thrown back into the sea. The Captain orders Dahl to be imprisoned in the lazarette, along with the mermaids.
During a storm, two ‘Soldiers of the Sea,’ tendril-covered humanoid figures riding giant spider crabs and carrying spears, climb from the sea onto the ship, presumably to rescue the mermaids. They are both killed before doing so, but manage to kill six crew members in the attempt. Captain’s Steward Fillip Dahl, who is imprisoned in the lazarette, breaks open the top of the Formosan chest (which has been placed in the lazarette). Although he describes the liquid in the top of the chest as ‘quicksilver’ (mercury), he presumably can see the shell that It-Beng Sia plunged into and left in the liquid during the mermaid attack, given that he reaches into the liquid and pulls the shell out. As with Sia, this burns his arm to the bone, and he dies.
After a relatively calm interlude, and without warning, the Kraken, a gigantic squid, attacks the Obra Dinn, killing seventeen of the crew before it retreats. While the attack is happening, the Captain goes to the lazarette and threatens the mermaids with death if they do not call off the Kraken. He then proceeds to kill the two mermaids who have shells, after which he apparently takes the shells and tosses them overboard. This seemingly is what causes the Kraken to retreat (a crewman in IX.1 remarks, “Captain came up from the hold. Says he chased it off.”). Sometime later, presumably on the Captain’s orders, Third Mate Martin Perrott, accompanied by two other crewmen, enters the lazarette to free the remaining mermaid. Perrott is spiked to death for his troubles, but tells the crewmen with him to give the mermaid the shell being held by the dead Dahl, asking her in exchange to see the Obra Dinn home. (In the present, glimmering light from the shell can be seen in the distance.)
With the Captain’s permission, the two remaining female passengers, the ship’s surgeon, and two other crew members are allowed to abandon ship in the remaining lifeboat. Evans, the surgeon, wanting to ensure that a future user of the Memento Mortem will be able to recover the memories in the lazarette, the door of which has been locked and the key lost (thereby preventing the Inspector’s access to the lazarette), pushes his leashed pet monkey through a lazarette window and then shoots it. He then pulls the body up to the window and cuts off one of the monkey’s paws, taking it with him. (As the monkey dies in the lazarette, the paw will enable the Memento Mortem user to access the lazarette.)
After some further fatal conflicts between members of the crew, only four remain alive on the ship. The Captain has locked himself in his quarters with the body of his wife, and the three remaining crew members threaten to break in and take the shells obtained from the mermaids. The Captain kills them all. He then shoots himself.
Suitability for teaching
Return of the Obra Dinn could be usefully taught alongside a work or works of age-of-sail nautical fiction or sea literature (especially to provide a visual, 3D rendering of what 18th-19th century sailing ships were like as well as how crewmembers would interact with each other), such as novels by James Fennimore Cooper, Frederick Marryat, Herman Melville (e.g., Moby Dick, Redburn, White Jacket, or the short story “Benito Cereno”), Richard Henry Dana, Jr.’s Two Years Before the Mast (1840), the novels of Joseph Conrad, Jack London’s The Sea-Wolf (1904), C.S. Forester’s Horatio Hornblower novels (1937-67), William Golding’s To the Ends of the Earth trilogy (1980-9), or Patrick O’Brian’s Aubrey-Maturin series. The sea monster element might make it appropriate to pair with Jules Verne’s Twenty Thousand Leagues Under the Sea.
Aspects of the story of Return of the Obra Dinn bear strong similarities to the historical mystery of the ship the Mary Celeste and its fictional treatments. The Mary Celeste was an American merchant ship that was found adrift and deserted off the Azores islands in the Atlantic west of Portugal on December 4, 1872. She had left New York City for Genoa in Italy on November 7. Her captain, Benjamin Briggs, was an experienced sailor who had used his savings to purchase four of twelve shares in the consortium that owned the Mary Celeste. On this voyage, Briggs’ wife and infant daughter accompanied him. Besides Briggs and his family, there were seven other crew members. The ship’s primary cargo was barrels containing alcohol. She was encountered by a Canadian ship, the Dei Gratia, who found her in a disheveled but seaworthy condition under partial sail and with her lifeboat missing. The last entry in her log was dated ten days earlier. The ship was still amply provisioned when found, and the crew’s personal belongings appeared largely undisturbed. None of those who had been on board were ever seen or heard from again.
The captain of the Dei Gratia, David Morehouse, decided to take the ship to Gibraltar at the entrance to the Mediterranean Sea; under maritime law, he would be able to claim an award for saving the ship based on its value and the difficulty of salvaging it. The salvage court in Gibraltar raised unsupported suspicions that the ship’s crew had murdered Briggs and his family and then abandoned ship in the lifeboat. “Commentators generally agree that some extraordinary and alarming circumstance must have arisen to cause the entire crew to abandon a sound and seaworthy ship with ample provisions,” but no satisfactory theory has been advanced that would explain what that circumstance was given the condition in which the ship was found (“Mary Celeste“).
The mystery of the Mary Celeste was the subject of much fanciful speculation and fictionalising: in 1904, an article in Chambers’s Journal speculated that a giant octopus or squid had attacked the ship. A young Arthur Conan Doyle wrote an 1884 story, “J. Habakuk Jephson’s Statement,” that was framed as an account by a surviving passenger. In Doyle’s story, the white passengers and crew are murdered by the black crew led by a mixed race passenger, whose goal is to return to Africa. The titular character is saved because he possesses an artefact that the black characters believe is a magical charm.
The ship was put back into service after this mysterious incident, and in 1885, the captain of the Mary Celeste deliberately wrecked the ship on a reef as part of an attempted insurance fraud. After an investigation by the insurers, it was determined that the ship was carrying a mostly worthless cargo that had been deliberately misrepresented and over-insured. Return of the Obra Dinn takes up the elements of the mysteriously abandoned ship and missing crew, criminal plots carried out by crew members against others aboard ship, a magical charm, an attack by a giant octopus or squid, and an insurance investigation from the Mary Celeste history, and reworks them into a fantastical sea disaster deduction game.
The work of course could also be included in a course focused on mystery or detective fiction. Mystery games provide an interesting development of this genre of fiction because they usually compel the reader/player to actively take part in the solving of the mystery. The Return of the Obra Dinn is notable for requiring the player to observe details of the ‘crime scenes,’ and make deductions based on evidence and process of elimination (see the video by the Game Maker’s Toolkit YouTube channel in ‘Sources and Resources’, below). Unlike classic detective fiction, where there is a seemingly impossible or unsolvable crime to be solved, the player’s greatest challenge is the identification of those aboard the Obra Dinn (i.e., connecting faces and names), which usually requires careful observation and inference about a character’s dress, activities and associations across multiple chapters.
The game is also a strong example of environmental storytelling, and is also interesting narratologically due to the story (fabula) telling the plot (syuzhet) more or less backwards. Aesthetically, the work is interesting in that it is a fairly accurate realist historical depiction rendered in a deliberately ‘retro’ computer visual style (monochromatic dithering). The default rendering emulates an early Macintosh monitor; other monitors emulated are: IBM 5151; Zenith ZVM 1240; Commodore 1084; IBM 8503, and LCD.
D. Walkthough
The order in which a player encounters the memories depends on the order in which they encounter the skeletal remains present on the ship, although this is mostly predetermined (see below). Every chapter of the story (except IV) has one or more sets of skeletal remains present on the ship that enable the player to access each chapter and its parts by using the Memento Mortem on them. The game starts with the final chapter (X, “The End”) and proceeds more or less backwards through previous chapters, and backwards from the ending parts to the opening parts of chapters, except for Chapter VIII, which can only be accessed at the conclusion of the game, after the player has left the Obra Dinn for good.
A description of the progress through the first chapter played (X, “The End”) will give an idea of the gameplay. When the assessor climbs from the rowboat to the main deck of the Obra Dinn, some skeletal remains are noticeable outside the quarters of the Captain and first-class passengers (the lower decks are not yet accessible). Using the Memento Mortem on these remains accesses Chapter X.1, which presents first (in audio form) the dialogue and other environmental sounds of the memory, followed by a dramatic tableau of a man firing a gun at another man (hitting him in the throat), while a crewman next to the shot man reacts in consternation. The player can also see another man with a knife in his teeth climbing the port side stairs to the poop deck. From the audio that precedes the tableau, it is clear that the man firing the gun (after flinging open the door of the captain’s quarters) is Captain Robert Witterel. When the memory closes and the logbook opens and populates the X.1 entry, the player, having used the E key to inspect the people in the memory and located where the man firing the gun is in the composite drawing, can identify Witterel there, and also note in the chapter part that the (as yet unknown) person who died was shot with a gun by Captain Robert Witterel. Two additional sets skeletal remains in the captain’s quarters are of as yet unknown crewmen (one being the crewman that was standing by the man Witterel shot, the other being the man climbing to the poop deck, who in X.2 is seen jumping from the poop deck to the deck behind the captain’s quarters), who we see being, respectively, knifed and clubbed by Witterel (X.2, X.3). At this point, the player has identified the cause and agent of death for three members of the crew, although they have not been able to identify any of them by name. A fourth set of skeletal remains in the hallway outside one of the passenger cabins reveals to the player that Witterel commits suicide with a gun (thus enabling the first full fate to be determined), after telling ‘Abigail’ that he just shot her brother (X.4). Consulting the manifest, the player learns that an ‘Abigail Hoscut Witterel’ is a passenger and can deduce (from the premise that the ‘Hoscut’ in Abigail’s name is her maiden name) that William Hoscut, listed as First Mate, is her brother and the man Witterel shot outside his quarters (the player’s second full fate determination). This completes the four parts of Chapter X in the logbook. A fifth skeleton, lying in the berth of the passenger cabin outside of which Witterel committed suicide, opens the final part of Chapter VII, “The Doom,” where the player learns the remains in the berth belong to Abigail (killed on the main deck and subsequently moved to the cabin). From this memory, it is clear that Abigail is the Captain’s wife (we can also fully determine her fate after this memory, which makes a third full fate determination, after which the three full fate determinations will be confirmed as correct).
While it is usually fairly easy to identify causes of death, it can be difficult to associate names in the manifest with the figures seen in the memories. Generally, as the game progresses, some broad differentiation can be made between officers and higher-ranked crew (midshipmen, stewards, tradesmen), passengers, and topmen and seamen, based on things like clothing, activity, location, and groupings in the composite drawing. (The logbook allows the player to label people temporarily as ‘Unknown Officer/Passenger/Steward/Topman/Seaman’). The player can also fairly easily identify visually the Indian seamen and the Chinese topmen, even if the player cannot initially assign individual names to the men in these groups. Some crewmen have distinctive visual features, manners of speaking, and national origins that help identify them, like the tattooed Maba from New Guinea or the turbaned Omid Gul from Persia (both topmen) or the Italian passenger Nunzio Pasqua (who addresses a person using ‘Signor”). One can try making some educated guesses based on this kind of information, but it is mostly possible to make all identifications through evidence, deduction, and process of elimination.
A helpful means of identifying the topmen (10 men) and seamen (15 men) is to check the hammocks (or lack of) on the Gun Deck when that deck is accessible in memories. This will enable the player to identify unique features about some of the sailors or will enable the determination of which players are dead or not at particular moments in the story (their hammocks will be missing or present as the case may be).
Sequence in which chapters/parts are encountered (skeletal remains in the present in bold):
X. ‘The End’: 1, 2, 3, 4 (Gun Deck becomes accessible)
VII. ‘The Doom’: 8, 7, 6, 5 (IX.6 also accessible), 4, 3, 2, 1 (hammocks viewable)
IX. ‘Escape’: 6 to 1 (Orlop Deck becomes accessible)
III. ‘Murder’: 3 (II.3 and VI.7 also accessible), 2, 1
II. ‘A Bitter Cold’: 3 to 1 (hammocks viewable)
VI. ‘Soldiers of the Sea’: 7 to 1 (Cargo Deck becomes accessible), 8
V. ‘Unholy Captives’: 4 to 1
IV. ‘The Calling’: 6 to 1
I. ‘Loose Cargo’: 2, 1
VIII. ‘The Bargain’: 5 to 1
Order of Identifications (numbers in bold in square brackets) according to order in which memories are encountered. Names in square brackets after the chapter/part numbers indicate the person(s) who die(s) in that part. Names are in bold when the person’s full fate–name, cause of death, agent of death–is able to be determined).
X. “The End”
X.1 [First Mate William Hoscut]: [1] Captain Robert Witterel (based on dialogue and consulting the manifest)
X.2 [Seaman Henry Brennan]
X.3 [Seaman Lewis Walker]
X.4 [Captain Robert Witterel]: [2] First Mate William Hoscut (dies in X.1; based on dialogue and consulting the manifest).
VII. “The Doom”
VII.8 [Passenger Abigail Hoscut Witterel; Disappearances: Topman Wei Lee; Helmsman Finley Dalton; Bosun’s Mate Charles Miner]: [3] Passenger Abigail Hoscut Witterel (based on dialogue in this memory and in X.4); [4] Third Mate Martin Perrott (based on dialogue and consulting the manifest). [5] Emily Jackson and [6] Miss Jane Bird: The other two female passengers are in this memory, and if the player looks closely, a ring can be seen on the ring (fourth) finger of the left hand of the women in front. This suggests she is married, and therefore cannot be the female passenger listed in the manifest as Miss Jane Bird. Therefore, she must be the remaining female passenger, Emily Jackson, and the woman cowering behind her is Miss Jane Bird. The player could also surmise that the woman who appears to be older and more assertive (she is seen firing a rifle in IX.2) is not the presumably younger Miss Jane Bird.
Other things of note: The man being lifted into the air by a tentacle near the front of the poop deck above the ship’s wheel/helm [the Helmsman]; the man near the stern poop deck stairs with two pistols and a rifle near him [the Gunner’s Mate]; the two men attacking a tentacle of the Kraken [the Bosun and the Bosun’s Mate]; the man pulling the body of Topman Maba [another Topman, Lewis Walker]
VII.7 [Topman Maba; Disappearances (men in lifeboat): Seaman Nathan Peters; Purser Duncan McKay; Seaman Alexander Booth]: [7] Topman Maba. He stands out because of his circular body and facial tattoos, and an ‘educated’ guess could identify him with the sole crewman from New Guinea (if, for example, one remembers that Moby Dick’s Queequeq was tattooed and originally from the South Seas).
VII.6 [Midshipman Peter Milroy; Disappearance: Topman Omid Gul]
Of note: The man falling down the stairs with multiple rifles [Gunner’s Mate]; Man falling from (presumably) top rigging into the sea [Topman Omid Gul].
VII.5 [Third Mate’s Steward Roderick Anderson]
Of note: This is the first opportunity to inspect the hammocks on the Gun Deck. Although more hammocks can be seen in VII.2, in this memory the player can see one hammock that can’t be seen in VII.2: hammock 43, belonging to Maba.
VII.4 [Gunner Christian Wolff; Seaman George Shirley]
VII.3 [Seaman Abraham Akbar]
VII.2 [Artist Edward Spratt]: [8] Artist Edward Spratt: When one examines him [E key] in this memory, the ‘E. S.’ signature from the composite drawing is highlighted, which makes him easy to identify. [9] Third Mate’s Steward Roderick Anderson (dies in VII.5): He is walking, dishes in hand, with the Third Mate toward the Officer’s Mess, and therefore can be assumed to be a steward, and specifically, the Third Mate’s Steward. Stewards wear buttoned-up jackets with dark collars, often over an apron.
Hammocks:
| Galley | ||
| Portside | Sternside | |
| 43. Maba | 48. N. Peters | |
| 44. L. Walker | 49. L. Linde | |
| —– | —– | |
| 45. L. Volkov | 36. O. Gul (hanging scimitar) | |
| —– | —– | |
| 56. H. Brennan | 41. W. Lee | |
| —– | —– | |
| 57. A. Booth | X. (A. Akbar) |
At this point, it may not be clear that crewmen’s hammocks are removed when they die (this becomes clearer in II.1). The player may have noted earlier (when first accessing the Gun Deck) that, in the present, only hammock 44 remains (Lewis Walker’s). Walker is the last sailor to die, although since sailor Henry Brennan dies just before him, the player may not be sure at this point which one is Walker. See IX.6, below.
Of note: The man getting items in the galley [First Mate’s Steward Paul Moss]; men talking at table [Topman Wei Lee and Seaman George Shirley]; on the Main Deck: The men examining the body of Lars Linde [Fourth Mate and his Steward].
VII.1 [Seaman Lars Linde]: [10] Seaman Lars Linde (based on dialogue and consulting the manifest). From the dialogue and consulting the manifest, the player can infer that the crewman who kills Linde is either Nathan Peters or Samuel Peters (besides the Witterels, this is the only shared surname in the manifest). If the player has understood the hammock removal process in VII.2, they can identify the killer as Nathan Peters.
Of note: The man in the lifeboat holding ledgers [the Purser].
IX. “Escape”
IX.6 [Midshipman Thomas Lanke]: [11] Seaman Henry Brennan (based on dialogue: his name is called and he has a hand to his ear). Once Brennan is identified, [12] Topman Lewis Walker can be identified, based on the hammock surviving in the present.
Of note: The stabbed man has crawled to and dies in the Midshipmen’s Cabin. The player can guess he is a Midshipman, but (according to the dialogue) not Midshipman Peter Milroy.
IX.5 [Fourth Mate John Davies]
IX.4 [Gunner’s Mate Olus Wiater]
IX.3 [Topman Leonid Volkov]
Of note: The man outlining the plan of mutiny speaks with a Germanic/Slavic accent of some kind. He is clearly an officer, but it is unclear if he is the Gunner, the Gunner’s Mate, or the Bosun.
IX.2 [First Mate’s Steward Paul Moss]: [13] First Mate’s Steward Paul Moss (based on dialogue and consulting the manifest).
IX.1 [Bosun Alfred Klestil; Disappearances: Passenger Emily Jackson; Passenger Miss Jane Bird; Fourth Mate’s Steward Davey James; Surgeon Henry Evans]: [14] Bosun Alfred Klestil (based on dialogue and consulting the manifest). The player has already seen the scene immediately preceding (VII.8, omitting Chapter VIII), and could deduce (again, from the dialogue) that the man with the Bosun fighting the Kraken is his Mate [15] Charles Miner. Miner is also wearing the ‘Breton Stripes,’ a shirt used by the French navy, which might be useful in his identification.
III. “Murder”
III.3 [Topman Timothy Butement]
Of note: The tattoo on the forearm of the man shot. [16] Helmsman Finley Dalton: he is the man by the helm speared in the leg; he is one of the disappearances in Chapter VII (last seen in the vicinity of the helm in VII.8), and in the “Justice At Sea” sketch, he is seen standing with his hand on the helm.
III.2 [Passenger Hok-Seng Lau]: [17] Hok-Seng Lau (based on dialogue); [18] Gunner Christian Wolff (dies in VII.4; based on dialogue and consulting the manifest). [19] Gunner’s Mate Olus Wiater (dies in IX.4; seen crouching behind the Gunner in this memory): with the Bosun and the Gunner identified, Wiater can be identified given his being seen earlier with guns, especially in IX.3, where he has a gun holstered at his back. His accent also helps identify him. The transcript in the logbook enables the identification of [20] Bun-Lam Lim.
Of note: The man in the apron by the animal pen [the Butcher] and the man next to him scratching his head with a two-pronged toasting fork [the Cook]; the Officer and the young man next to him covering his ears [Fourth Mate and his Steward]; the man (a Steward) whispering into the ear of an Officer [the Second Mate and his Steward]; the Third Mate’s Steward standing near the Third Mate (both already identified). By now, the player can surmise that the cluster of men in the top left of the “Justice at Sea” sketch are all stewards.
III.1 [Passenger Nunzio Pasqua]: [21] Second Mate Edward Nichols (based on dialogue and consulting the manifest); [22] Passenger Nunzio Pasqua (based on dialogue and consulting the manifest). Given his presence in III.2 & III.3, the player can guess that the steward whispering to Nichols in III.2, and who is a part of the group that is stealing the Formosan chest and kidnapping the “Formosan Royalty” is Nichols’ steward [23] Samuel Galligan. Now that the other three officers (or Mates) have been identified, the player can identify the remaining officer (wearing an officer’s hat in the “Justice at Sea” sketch) as [24] Fourth Mate John Davies (dies in IX.5), and guess that the young man with him in VII.2 and III.2 is his Steward [25] Davey James. Identifying Davies allows for Gunner’s Mate Olus Wiater’s full fate to be determined.
II. “A Bitter Cold”
II.3 [Cow]: [26] Butcher Emil O’Farrell (based on dialogue and consulting the manifest); [27] Midshipman Charles Hershtik (based on dialogue and consulting the manifest; the other Charles, Bosun’s Mate Charles Miner, already identified). The three men in this scene (other than the butcher) are grouped together in the “Justice at Sea” sketch. In IX.6, the stabbed man who has crawled to the Midshipman’s cabin speaks of trying to save Peter, and he is not Charles Hershtik, so, presuming he is a Midshipman, he must be [28] Thomas Lanke. That means that the third man is [29] Midshipman Peter Milroy (dies in VII.6, with Lanke present).
II.2 [Seaman Renfred Rajub]: [30] Surgeon Henry Evans (Evans has presumably survived, since he provided the inspector with the logbook, and he is seen as one of the party fleeing the ship in IX.2-3. Since he appears to be in Morocco [were he want the logbook to be mailed], we can fully solve his fate along with the rest of the fleeing party who are with him (who are listed as ‘Disappearances’ in Chapter IX in the logbook): Passengers Emily Jackson and Miss Jane Bird, and Fourth Mate’s Steward Davey James; [31] Surgeon’s Mate James Wallace (based on presence in Surgery).
II.1 [Seaman Solomon Syed]: [32] Seaman Solomon Syed (based on dialogue and consulting the manifest, and by hammock number); [33] Seaman Renfred Rajub (lying in his bunk with his face uncovered, based on hammock number; dies in II.2). [34] Seaman William Wasim (based on the only empty hammock of the Indian seamen). [35] Seaman Abraham Akbar (dies in VII.3; his hammock is marked ‘X,’ but he is the only Indian seaman remaining to be identified: all the Indian seamen are sitting together in the “Under Way” sketch). By examining the hammocks, the player can identify the man with the forearm tattoo, [36] Topman Timothy Butement (dies in III.3).
Of note: Hammocks. In this memory, the hammocks closest to the Galley can be seen in black outline, but the numbers cannot be read. These hammocks (43, 44, 48, 49; italicized below) were earlier viewable in chapter VII.2. Hammocks in bold below remain in VII.2, which indicate the others have perished or disappeared after II.1 and before VII.2.
| Galley | ||
| Portside | Sternside | |
| 43. Maba | 48. N. Peters | |
| 44. L. Walker | 49. L. Linde | |
| —– | —– | |
| 37. T. Butement (forearm tattoo) | (stairs up) | 36. O. Gul |
| —– | —– | |
| 42. N. Botterill | —– | |
| —– | —– | |
| —– | 39. J. Zhang | |
| 47. A. Toporov (empty; satchel & pipe) | (cardplayer) | 40. L. Hong |
| 45. L. Volkov (empty) | (cardplayer) | 41. W. Lei |
| 46. A. Nikishin (empty) | (cardplayer) | —– |
| —– | 59. G. Shirley | |
| 56. H. Brennan | 38. H. Li | |
| 55. H. Diom | —– | |
| —– | 54. S. Syed | |
| 58. P. O’Hagan | X. (A. Akbar, #52 in manifest) | |
| 57. A. Booth | —– | |
| 51. R. Rajub | ||
| 52. W. Wasim (empty) |
The player might note that there are many more hammocks in this memory than in the later memory VII.2 (as well as recall that in the present there is only one hammock), and may infer that removed hammocks means their occupants have died in the interim. The player knows that Butement above dies in III.3 and his hammock is gone in VII.2. The three empty hammocks 47, 45, 46 can be linked with the three Russians playing cards nearby, and only one of these (25) remains in VII.2. Players should note the satchel and pipe by hammock 47. Also, of the four Chinese Topmen’s hammocks (39, 40, 41, 38) only one (41) remains in VII.2. Additionally, the four Indian Seamen’s hammocks have been removed, and the player has already seen three of them die.
VI. “Soldiers of the Sea”
VI.7 [Ship’s Steward Zungi Sathi]: In the “Justice at Sea” sketch, Sathi is standing near the Stewards of the First, Second, and Third Mates, so it can be inferred he is a steward, but it is not clear whether he is the Ship’s Steward or the Captain’s Steward, although the player might identify this man visually as Indian and not Swedish. Although it is difficult to make out the crew member who is firing the rifle that kills Sathi (Bosun’s Mate Charles Miner), his shirt is lighter, and in VI.5 Miner is seen with a rifle, and in VI.4, Miner is being handled a rifle from the Gunner’s Store, so if he not identified in this memory (as Sathi’s killer), he can be in VI.5 or VI.4. [37] Purser Duncan McKay (disappears/dies in VII.7). Through the viewing holes in the port walk, a man can be seen hiding in the Purser’s Office (if the player misses him in this memory, he is also seen in the office in VI.6 and VI.5). This is the same man holding the ledgers in the lifeboat in VII.1, and this enables his identification.
VI.6 [Butcher Emil O’Farrell] (identified in II.3).
Of note: The three Midshipmen are here: Peter Milroy with a bucket, pouring water over Charles Hershtik and a soldier of the sea, with Thomas Lanke nearby with a sword.
VI.5 [Midshipman Charles Hershtik] (identified in II.3). Peter Milroy and Thomas Lanke are also present, holding swords.
VI.4 [Surgeon’s Mate James Wallace (identified in II.2); Topman Jie Zhang]
Of note: Midshipmen Charles Hershtik (throwing lantern); Peter Milroy and Thomas Lanke with swords. Gun Deck: [38] Topman Omid Gul (disappears/dies in VII.6) (with scimitar)
VI.3 [Carpenter’s Mate Marcus Gibbs]
Of note: Fourth Mate John Davies (with sword) and his Steward Davey James in the galley.
VI.2 [Topman Nicholas Botterill]: [39] Topman Nicholas Botterill. In the memory chronologically following this memory (VI.3), someone is heard saying “Stay back, it’s already done for Nick!”
VI.1 [Topman Huang Li]. In this memory, one can distinguish the Topmen from the Seamen. All the living Topmen are present, including Nicholas Botteril, who is below on the side rigging. By this point, Maba, Lewis Walker, Timothy Butement, Omid Gul, and Nicholas Botterill have been identified, leaving the four Chinese and one Russian Topmen to be identified. The player already knows that one of the missing Topmen, Timothy Butement, is dead (III.3), and, as there is only one unidentified non-Chinese Topman in the memory, he must be [40] Topman Leonid Volkov (dies in IX.3). Identifying Volkov enables the player to determine the full fate of First Mate’s Steward Paul Moss (dies in IX.2). The other missing Topman, who must be one the Chinese Topmen, presumably has died before this memory.
VI.8 [Carpenter Winston Smith]
V. “Unholy Captives”
V.4 [Seaman John Naples]: [41] Seaman John Naples (based on dialogue: he is called John, and the other John, Fourth Mate John Davies, has already been identified). [42] Captain’s Steward Filip Dahl (based on dialogue). Identifying Dahl allows for the identification of [43] Ship’s Steward Zungi Sathi (dies in VI.7).
Of note: Carpenter and Carpenter’s Mate with stretcher. Olus Wiater and his holstered gun.
V.3 [Seaman William Wasim] (identified in II.1). [44] Carpenter Winston Smith (dies in VI.8) and [45] Carpenter’s Mate Marcus Gibbs (dies in VI.3). They are seen working in the Carpenter’s Shop, and as Gibbs, in VI.3, says “Come on, boss!” (presumably to Smith who is crouched behind him and who is presumably the person who responds, “No, get down!”), he can be identified as the Carpenter’s Mate, and Smith as the Carpenter.
V.2 [Cook Thomas Sefton]: [46] Cook Thomas Sefton (based on dialogue and consulting the manifest).
Of note: Present are the three Midshipmen; Stewards Roderick Anderson and Davey James; this memory provides the best sight the player gets of Ship’s Steward Zungi Sathi (with lantern).
V.1 [Passenger Chioh Tan; Seaman Hamadou Diom]
IV. “The Calling”
IV.6 [Second Mate Edward Nichols]
IV.5 [It-Beng Sia]
IV.4 [Bun-Lam Lim]
IV.3 [Second Mate’s Steward Samuel Galligan]: Although her death is placed in IV.4, it is in this memory that we see the cause of Passenger Bun-Lam Lim’s death (identified in III.2); [47] Seaman Aleksei Toporov (identified by his pipe).
IV.2 [Seaman Patrick O’Hagan]: The player knows from II.1 that the man being dragged overboard by the mermaid is one of the Russian seamen, and therefore must be the remaining one, [48] Seaman Alarcus Nikishin. In IV.3, Samuel Galligan says, “O’Hagan, can you row?” and because the other non-Russian rower is one of the Chinese Topmen, the rower speared in this memory is [49] Seaman Patrick O’Hagan. In the logbook transcript of this memory Bun-Lam Lim identifies the other kidnapped Formosan as “Beng,” so the Formosan who dies in IV.5 is [50] Passenger It-Beng Sia. Sia’s identification enables the player to complete the full fate for Second Mate’s Steward Samuel Galligan (identified in II.1, dies in IV.3), and allows for the identification of the remaining Formosan, [51] Passenger Chioh Tan (dies in V.1), which in turn allows for the completion of the full fate of Second Mate Edward Nichols (identified in III.1, dies in IV.6).
IV.1 [Topman Li Hong]
At the completion of IV, the player will have witnessed the deaths of three Chinese Topmen in VI.4, VI.1, IV.1. As the fourth Chinese Topman only disappears in VII.8 (as the player learns prior to these deaths), he must be the Chinese Topman with a hammock in VII.2, [52] Topman Wei Lee.
I. “Loose Cargo”
I.2 [Stowaway in barrel]
Of note: Seaman Lars Linde can been seen on the deck above helping with the crane (also in I.1)
I.1 [Seaman Samuel Peters]: Here the player can see that what happens in this memory is the source of the accusation the one Peters brother levels at Seaman Lars Linde (killing his brother). The man who dies in this memory, and who is pictured in “Under Way” next to the Peters brother who accuses (and kills) Linde, is the other Peters brother. As this brother dies before the voyage is underway, the presence of the hammock of Nathan Peters (48) in VII.2, enables the identification of [53] Seaman Nathan Peters (dies in VII.7), [54] Seaman Samuel Peters, and enables the determination of the full fate of Seaman Lars Linde (dies in VII.1).
After all the Chapters have been encountered, it starts to rain, and the sailor who rowed the player to the ship calls out that they should leave before the storm hits. The player can leave at this point, but as they cannot return, the rest of the fates should be determined before they leave.
At this point, there are six members of the crew who can be but have not yet been identified: Seamen Alexander Booth, George Shirley, and Hamadou Diom, and Topmen Jie Zhang, Li Hong, and Huang Li.
In II.1, the player can note that the hammock of George Shirley is amongst those of the Chinese topmen, and can guess that the unidentified seaman talking to the remaining Chinese topman Wei Lee in VII.2 is [55] Seaman George Shirley. The unidentified owner of one of the hammocks (57) in VII.2 is Alexander Booth, and of the remaining two seamen, only one is alive in Chapter VII: the seaman who flees the ship with Seaman Nathan Peters and Purser Duncan McKay, so he must be [56] Seaman Alexander Booth. Therefore the seaman who dies in V.1 is [57] Seaman Hamadou Diom.
The Chinese Topmen can supposedly be identified by their distinctive footwear and stockings. In II.1, these can be seen as their legs dangle from their hammocks, which allows for footwear to be associated with names (via the hammock numbers): Hammock 38 wears slippers with dark tops and light soles and white stockings and hammock 40 wears dark ankle-high shoes with white stockings (these are both best recognized in III.2 when their respective owners [58] Topman Huang Li and [59] Topman Li Hong are sitting on posts on the mast; Huang Li’s footwear can also be seen in VI.1 and V.1); hammock 39 wears slippers with light tops and dark soles and striped stockings (these are best recognized in VI.4, when their owner [60] Topman Jie Zhang is being strangled by the spider crab; they can also be seen in VI.1). The image quality makes this recognition quite challenging, and it might be easier simply to keep guessing which topman is which until the correct identifications are confirmed.
Once all the fates above have been determined, the game announces that there is no more that can be learned on the ship (even though two fates remain to be solved). The player climbs down into the rowboat and is rowed away from the Obra Dinn.
An intertitle announces ‘One Week Later,’ and the player is presented with the insurance assessment they have made. This notes that the Obra Dinn was “Damaged in squall, Atlantic. Sunk in storm, Falmouth.” The assessment contains a list of all the people on the ship, their cause of death, and any findings for or against them (valour, murder, mutiny, abandonment of ship), for which their estates are given outstanding wages or outstanding wages plus awards, or fined (Capt. Witterell’s estate is forfeited). In somes cases there is no claim, and, for people whose estate is unknown, any payout to it is instead donated to the Company’s pension fund.
After the player peruses the assessment, they are told that the Inspector keeps the Memento Mortem, but mails the logbook to Henry Evans (as per his request).
Another intertitle announces “One Year Later.” The Inspector is sitting at her desk in her study. The housekeeper can be heard answering the door. She enters and hands over a parcel that was just delivered, remarking that it smells terrible. Inside the package is a letter from Jane Bird, informing of Henry Evans’ death from an illness, a small wrapped bundle, and the logbook. A note from Evans on the inside cover reads, “This tale belongs to you now.”
When the bundle is unwrapped, it reveals an animal claw (the monkey’s paw). Using the Memento Mortem, this provides access to the final chapter.
VIII. “The Bargain”
VIII.5 [Evans’ pet monkey]: The monkey can be seen perched on Evans’ shoulder in II.3.
VIII.4 [Third Mate Martin Perrott] (identified in VII.8)
VIII.3 [Mermaid]
VIII.2 [Mermaid]
VIII.1 [Captain’s Steward Fillip Dahl] (identified in V.4)
Once the two final fates are determined, the Inspector gets up from her desk and places the logbook on a bookshelf. The game ends.
D. Sources and Resources
- Wikipedia entry: https://en.wikipedia.org/wiki/Return_of_the_Obra_Dinn
- “Mary Celeste.” Wikipedia. Accessed 10 August 2024.
- Fandom Wiki: https://obradinn.fandom.com/wiki/Return_of_the_Obra_Dinn_Wiki
- Metacritic (Critic Reviews):
- (PC) https://www.metacritic.com/game/pc/return-of-the-obra-dinn/critic-reviews
- (PS4) https://www.metacritic.com/game/playstation-4/return-of-the-obra-dinn/critic-reviews
- (Switch) https://www.metacritic.com/game/switch/return-of-the-obra-dinn/critic-reviews
- (XBox One) https://www.metacritic.com/game/xbox-one/return-of-the-obra-dinn/critic-reviews
- YouTube playthrough (Stugav): https://www.youtube.com/watch?v=picaFZjA6lc
- Game Maker’s Toolkit, “How Return of the Obra Dinn Works.” [Reflects of the challenges of creating effective detective games, and how Return of the Obra Dinn addresses these challenges.]
